How to Setup VPN on Xbox
Xbox is one of the most popular consoles of all times, one of the biggest contributing factors to this is the Xbox Live service which offers free games, streaming and other multimedia. If you use your Xbox, so being connected through a VPN will mean that:
You can access geoblocked content which is only available in some countries such as Hulu, LoveFilm and Netflix and even game demos.
It can greatly expand the player base for multiplayer games by appearing to originate in a country such as the US or UK.
How to use VPN on an Xbox
There are two basic (indirect) ways of connecting your Xbox to the internet via a VPN:
Method (1): Connecting it to your computer and sharing its’ internet connection (Recommended for little technical experience).
Method (2): Connecting to a DD-WRT flashed router.
Method (1): Sharing VPN connection through your PC
To be able to create this set-up you will need:
At least one Ethernet cable and of course an Xbox and a computer.
Depending on the operating system installed on your computer, follow the following steps:
Sharing a VPN Connection with Windows (7):
Set up your VPN connection on your computer.
Connect your computer to your router either through Wi-Fi or by using an Ethernet cable.
Connect your Xbox to the PC using the Ethernet cable and make sure that the “IP Settings” and “DNS Settings” for the Xbox are set to “Automatic” (Settings / System Settings / Network Settings through your Xbox Menu).
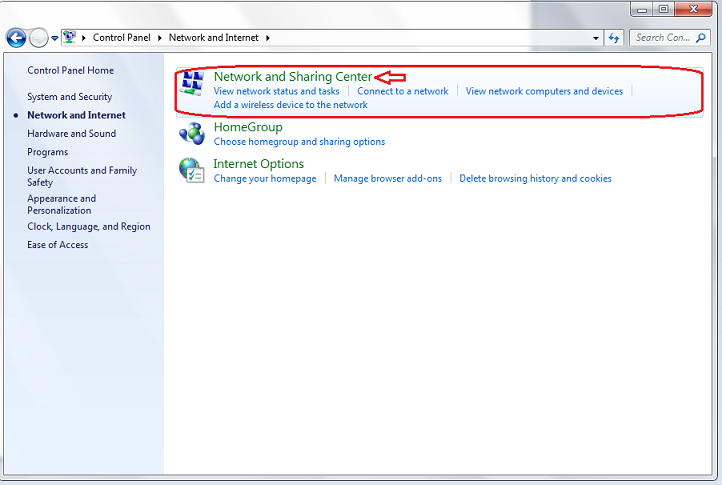
Open the “Network and Sharing Center” on your computer.
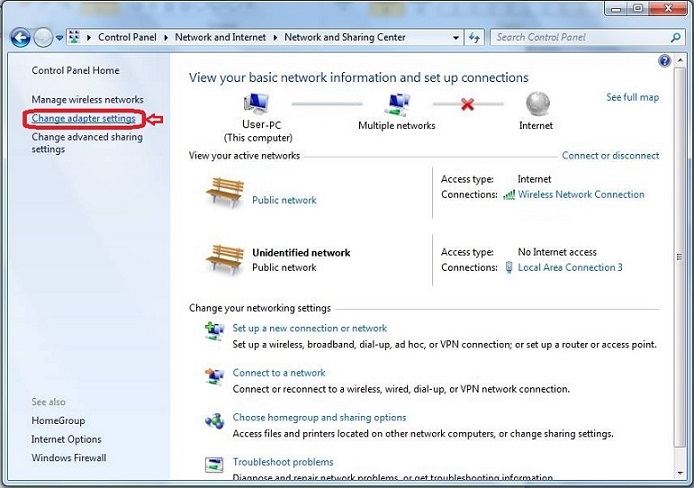
Click on “Change adapter settings”.
Right click on your VPN connection then choose “Properties”.
Under the “Sharing” tab:
Check the “Allow other network users to connect through this computer’s internet connection” checkbox.
From “Home Networking Connection” drop-down menu, choose “Local Area Connection” (if you have multiple Ethernet ports or a computer that can host a Wi-Fi connection then make sure you select the correct one), then click “Ok”.

Restart your computer and your Xbox. Now, you should be ready to play securely.
Sharing a VPN connection in Mac OSX:
Set up your VPN connection on your Mac.
With your Xbox switched off, connect it to a USB port on your MAC using an Ethernet cable and adapter.
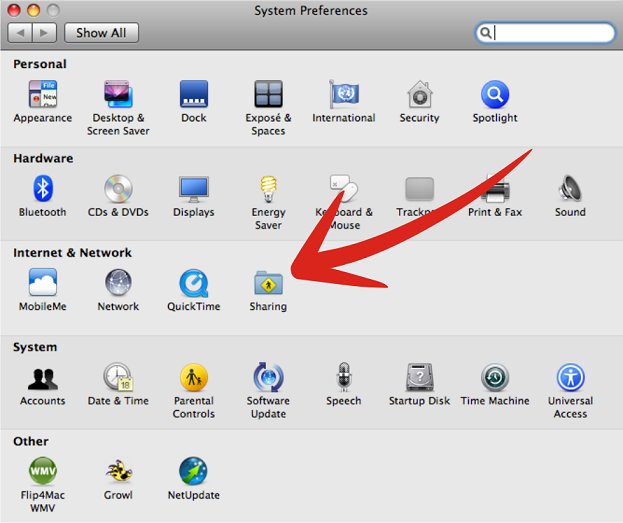
For your MAC, click on Apple icon at top right of the screen, open “System Preferences” and click on “Sharing”.
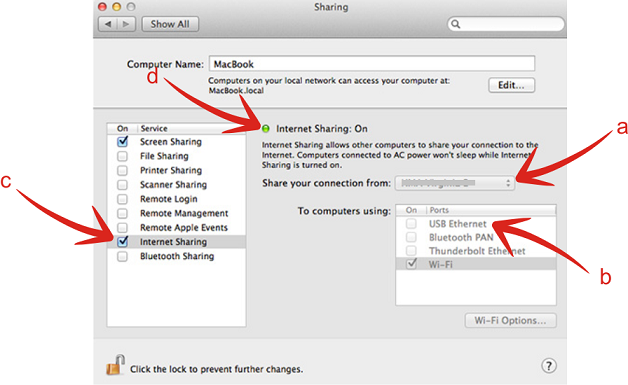
On “Sharing” window:
Pull down the “Share your connection from” menu and select your VPN connection.
In the “To computers using” box, check “USB Ethernet”.
On the left side, check “Internet Sharing”, and a pop-up box will appear. Click “Start”.
“Internet Sharing: On” will show green to let you know that everything is working ok.
Restart your PC and Xbox.
On your Xbox look in (System Setting / Network / Wi-Fi / Test XBOX Live), to make sure that you are connected.
Method (2): Connecting an Xbox to a VPN using a flashed router
The more involved way of connecting your Xbox VPN is by flashing a router with DD-WRT firmware; the other advantage of this is that all devices connected to the router will also use the VPN.